Our home office is right by the front door, so it’s the first thing people see when they come in. For a long time, it didn’t look great. The shelves were messy, and there just wasn’t enough space to keep things neat. It was clear we needed to make a change.
We wanted the room to work better and look better. That’s when we decided to build a bookcase that looked built-in.

Why Built-In Shelves Were the Right Fit
This office isn’t just for looks. We use it all the time—to work, print, and store everyday stuff. So the solution had to be useful and look nice. A wall of built-in shelves checked both boxes. It would help hide the mess, give us space to stay organized, and add something special to the room.
One of the walls has a deep recess—135 inches long and 18 inches deep. It was the perfect spot to build something into.
DIY Plan With a Bit of IKEA Help
Hiring someone to build shelves wasn’t in our budget. So we took on the project ourselves. At the end of the day, built-ins are really just bookcases with trim around them to make them look like part of the room. But I had one extra wish—I wanted drawers.
Building drawers takes time and skill. That’s where IKEA came in. I found their HEMNES collection, which is made from solid wood and includes pieces with drawers. It felt like the right choice.
Planning the Setup

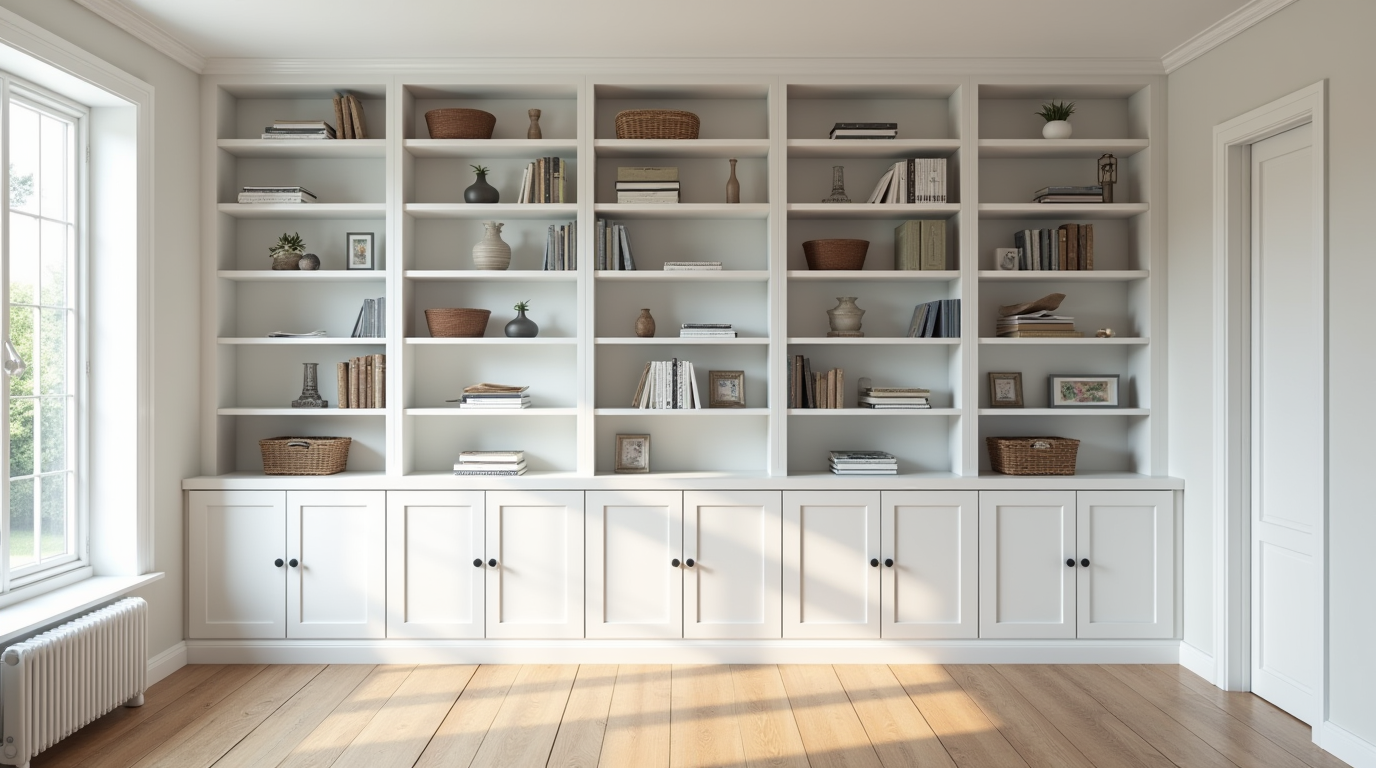
After testing different layouts, we settled on three narrow HEMNES bookcases in the middle and two cabinet units on each side. We didn’t use the glass doors that came with the cabinets because they felt too fancy for an office.
I placed the center shelves close together to make them feel like one main unit. To finish the look, we decided to go all the way up to our 9-foot ceiling.
To do that, we took extra HEMNES bookcases and cut them into smaller pieces to fit on top. This gave us that floor-to-ceiling look we were going for. We even left the tops of the center shelves open to make them feel lighter and a little different from the rest.
Putting the Bookcases In
First, I painted the room but skipped the alcove area since it would be covered. We removed the trim along the floor, then put together the IKEA pieces and set them in place.
We built the upper shelves by cutting full-size bookcases into 28.75-inch-tall sections. Then we made bases out of MDF scraps and stacked them on top of the lower units. Everything was secured to the wall with L-brackets to keep it all steady.
Adding the Trim
The trim really made a big difference. It’s what helped the shelves look like they were built into the room. Here’s what we added:
- A wide board along the bottom to cover the legs
- Matching baseboard and quarter-round in front of that
- Crown molding across the top
- Fluted trim between the bookcases to hide the spaces
- Thin boards between the top and bottom shelves to tie it all together
These small touches made it look much more finished.
The Final Details

Once the shelves were in, I added more holes to place the shelves where I needed them. I also changed the drawer handles to oil-rubbed bronze bars for a cleaner look. Then I filled in the gaps with caulk and gave everything a few coats of white enamel paint.
The result looked great—clean, simple, and made to fit our space.
What We Learned From Our IKEA Bookcase Project
It was a big job, but we’re so glad we did it. We now have a wall of built-in bookcases that helps us stay organized and makes the room look much better.
If you’re thinking about doing a built-in project with IKEA pieces, don’t worry. With a plan, some tools, and time, you can build something that looks great and feels right for your space—without spending a lot.
Want to try your own DIY built-in bookcase using IKEA shelves? This could be just the push you need.


