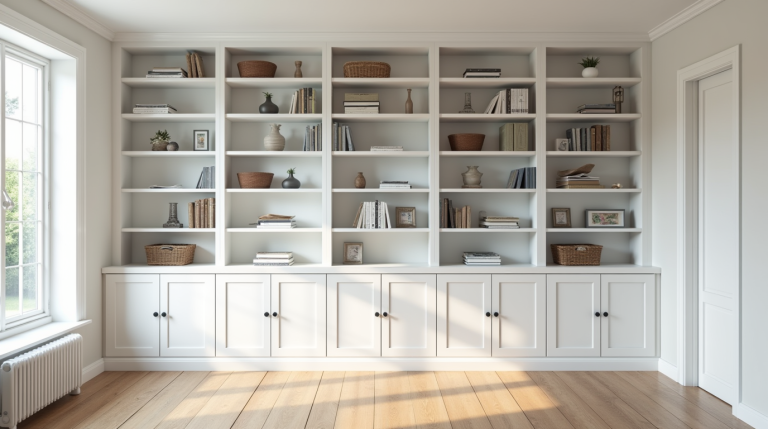
So in my home office makeover post I promised to tell a little more detail about my built-in bookcases and how I styled them. To be honest, after I finished my office makeover I needed a break from writing about my office (and you guys probably needed a break from hearing about it 🙂 ), and I also needed to get started on my dining room. So I’ve avoided writing this post for awhile. But I had a question about the built-ins come up recently, and I realized it’s time to finally write this post and give a little more information about the built-ins, focusing on how I styled them and how I use them.
As I mentioned before, our home office is at the front of our house and is basically the first thing people see when they walk in. So I wanted it to look pretty and presentable all the time, yet it still needed to be functional.
This is what people used to see when they walked in:
before
The shelves were hard to keep neat and there were too many boxes to dig through to try to find what I was looking for, not to mention there was no real style to the arrangement of items on the bookshelves. Having all of our stuff sitting out in the open was simply not working. What I needed was a way to hide all of our stuff and still make it easily accessible. And that is why I chose to create a built-in storage system with drawers.
I love, love, LOVE the drawers! Back when I was planning out the design I considered skipping the drawers because it would’ve made the whole process of constructing this thing cheaper and quicker. But I am SO GLAD I stuck with the idea of having drawers along the bottom. It was worth the extra money and time!
After we finished building the built-in bookcases I added some Ikea gray boxes along the bottom. This gave me added storage while also creating a visual base for the entire built-in. It looked like this with empty shelves, drawers and boxes:
Then I brought in all of the items we had sitting in our office before except for the books, and this is what I had:
My goal was to fit all of that stuff in the drawers and boxes. And I’m happy to say I did! After it was all put away, the built-in looked like this:
You’d never know I was there 🙂 .
And my drawers look like this inside:
For a neat freak like me that’s total eye candy!… No more trying to figure out which box on the shelf has my hole punch and digging for it.
With our supplies neatly tucked away along the bottom of the built-in, that left me the top area to store some books and to decorate.
I covered all of the books with gray kraft paper and wrote the title on the edge in white colored pencil. The colored pencil was perfect because it’s not too bold that it becomes distracting, yet it’s still legible.
Then I added the pretty!
I knew I didn’t want to spend much money on the decor since I had already spent enough on other areas of the room so I focused on getting these items as inexpensively as possible. I saved money by using all of the following techniques in some form:
- shopping thrift stores
- repurposing items from other areas of our home
- buying things on clearance
- using coupons
- making items myself (see my Z Gallerie inspired decorative boxes and painted glass vases)
I also needed to arrange the items with style, and I ended up creating a computerized image of how I could arrange everything as well as a full source list with costs.
a mock up of how I planned to style my bookcases
Visually, I tried to keep variety yet balance among everything.
I wanted the colors to coordinate with the room and be soft, but I didn’t want everything to be so similar that it ended up just looking flat. I focused on using objects that were various shades of the colors in the room—aqua and gray—mixed with neutral colors and different textures. I tried to evenly disperse the colors and textures throughout the shelves.
I also had to work with the shapes and location of the shelves. I tried to fill the top shelves with things we don’t need to access regularly…
I made the framed quotes at the top of the bookcases myself
And I filled the narrower shelves with smaller sized objects…
I used the wider shelves to set up small vignettes of decorative objects…
If you read my mantel styling tips post then you’ll noticed I used many of the same design techniques I recommended for mantels in my built-in bookcases as well. Visual triangles, layering, balance, stacking and personal touches are all used in various ways in my arrangement of decor.
the end result!
It has been so nice to have such a functional but beautiful storage piece in our office! It really is the highlight of the room!
In case you missed it, my home office makeover was featured over on Thrifty Decor Chick’s blog this week. So go check out all the great before and afters from this month!
Ok, so now I’m going back to “our regularly scheduled programming”… my dining room! I’m in the midst of another big project there!
Did you buy the built in shelves from IKEA or did you use your existing bookshelves? I really like your built ins!
Hi, I bought free-standing bookshelves from Ikea and then turned them into built-ins… I explained it all in this post https://studio36interiors.com/diy-built-in-bookcase-reveal-an-ikea-hack/
Which kind and size gray boxes did you use from IKEA?
These were called KVARNVIK… not sure if they’re still available to purchase because it was years ago I bought them.
wowza! you guys nailed this! I found you by searching for a super basic Ikea shelving hack and am now so impressed and inspired to kick my project up a notch (or seven!) and that center piece? Pure MacGuyver! Bravo!
Thanks! Yeah we definitely channeled MacGuyver with this project, lol! I’m so glad you found the post and that it has inspired you. Best of luck!
Hi! Totally impressed with your works! May I know what did you do with the books to make them look similar? Thanks a lot!
Thanks! I wrapped all the books in gray craft paper.
Wow – I am SO impressed by this project. Great job!
Oh my gosh! that is absolutely amazing! I am trying to figure out if I have the patience to take this on!
What program do you use to do your mock ups?! I am so blown away!!!
Thanks! For this post I used Photoshop for the mock ups.
Hi, I happened to come across your brilliant Ikea hack as I was looking at another project, and I just want to say that I am blown away by the amazing job you and your husband did. From start to finish, making “built-in” shelves for your tall walls looked like a Herculean task, but you guys proved that it was not only doable, but cost effective and efficient too. Bravo!!!
P.S. Not that this affects the beautiful aesthetic of your work, but I noticed that the center bookcase shelf (the one holding the metallic vase) is a little lower than the others in the same row. (My slight OCD-ness made me want to tell you, but by no means is it a criticism). Love your work! 🙂
We even share the same colors! I will be measuring my walls to determine how much of this hack I can install. I am planning to add alot more framed art but like the idea of the covered books. You are very good. Thank you.
Thanks for the compliment! That’s so kind of you! Good luck with your project!
Beautiful! What a great workspace!!
Thanks! It is a bright, happy organized space which makes it easier to work 🙂 .
What program did you use to do a mock up or different design ideas
I used Photoshop for this.